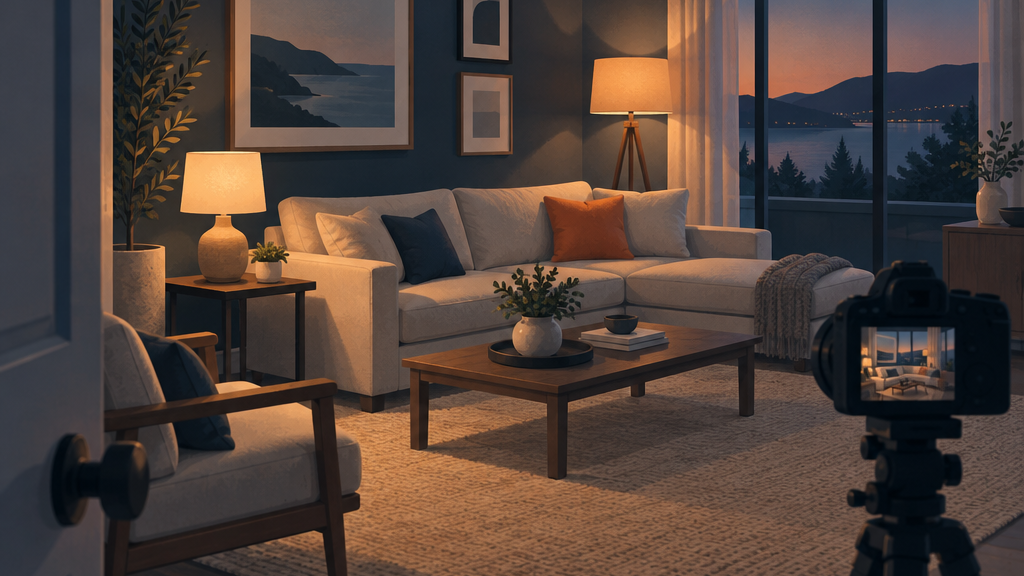
Good short-term rental listing photos come from three lighting decisions made before the camera comes out: shoot when daylight is soft and even, put every fixture in the house on bulbs of the same color temperature (2700K–3000K for living spaces is the safe default), and layer lamps so no corner falls into shadow. Then bracket your exposures so the windows and the room both read correctly. Fix the bulbs first. They show up in every photo and every night of every stay.
This guide covers the timing, the bulbs, the room-by-room setup, the camera basics, and when a professional photographer is the cheaper choice.
Last updated: 2026-09-24
Why Lighting Decides Whether The Photo Gets The Click
Guests scroll past a dark or muddy photo in less time than it takes to read your title, so lighting is a revenue input, not a decorating choice.
Your first photo does the job a storefront does. On a search results page it sits next to a dozen other listings at similar prices, and the guest decides in a glance which ones to open. Airbnb's own guidance on building a listing page tells hosts to use compelling photos that show what is unique about the place (Airbnb listing page guidance). A bright, evenly lit room reads as clean, spacious, and cared for. A dim one reads as small and tired, even when it isn't.
Three lighting failures show up again and again in listings that underperform:
Mixed color. A cool-white ceiling fixture, a yellow lamp, and blue window light in one frame. The room looks dirty, and no amount of editing fully fixes it.
Blown windows. The room is exposed correctly, but the windows are pure white rectangles. The view you paid for is gone.
Cave corners. One overhead fixture lights the middle of the room and leaves the edges black, which makes the room look smaller in the photo.
Each has a cheap fix, and none requires a new camera.
Lighting also carries past the photo. The guest who books because the living room looked warm and bright expects that room at 8 p.m. If the in-person stay runs on two harsh overhead fixtures, the gap between photo and reality shows up in the review. Plan lighting for both moments at once.
Natural Light: When To Shoot And When To Wait
Shoot interiors when daylight is bright but indirect, and schedule exteriors around the sun's position rather than your calendar.
Direct sun through a window paints hard bright patches on the floor and leaves deep shadow beside them. The camera can't hold both. Soft, indirect daylight fills a room evenly and does most of your work for free.
Practical timing rules:
Interiors: Mid-morning or mid-afternoon on a lightly overcast day is often ideal. On a clear day, shoot rooms when the sun isn't coming straight through their windows. A south-facing living room may look best in early morning; a west-facing bedroom may look best before noon.
Exteriors and curb shots: Front-facing facades look best when the sun is behind the photographer, not behind the house. Check which way the front door faces before you book the shoot.
Twilight hero shot: The short window just after sunset, when the sky turns deep blue and every interior light is on, produces the warm glowing-house photo that many top listings lead with. It lasts minutes, not hours.
Use the NOAA Solar Calculator to find sunrise, sunset, and solar position for your exact address and date (NOAA Solar Calculator). It's free.
Before the shoot, open every blind and curtain fully, clean the glass inside and out, and remove window screens you can take off without tools. Screens flatten the view and dull the light coming in.
Bulb Color Temperature: The Kelvin Decision
Pick one color temperature for the whole living area and put every bulb on it, because mismatched bulbs are the most common lighting defect in STR photos.
Color temperature is measured in Kelvin (K). Lower numbers look warmer and more yellow; higher numbers look cooler and more blue. Bulb packaging prints it on the box, usually with a label like "soft white" or "daylight."
Kelvin range | Common label | How it looks | Where it works in an STR |
|---|
2700K | Soft white / warm white | Warm, like a traditional incandescent | Bedrooms, living room lamps, dining |
3000K | Warm white / bright white | Warm but crisper | Living areas, hallways, overall default |
3500K–4000K | Neutral / cool white | Clean, neutral | Kitchens, laundry, work desks |
5000K and up | Daylight | Blue-white, clinical | Garages, utility rooms; avoid in guest living spaces |
My rule for operators: pick 2700K or 3000K for everything a guest relaxes in, and hold that line in every lamp, sconce, and ceiling fixture. If you want the kitchen crisper, move it to 3500K as a whole room, not one bulb at a time. The camera exaggerates color differences the eye forgives, so a single 5000K bulb in a 2700K room shows up as a blue stain in the photo.
Two other numbers on the box matter:
Lumens tell you brightness. Watts only tell you power draw. When you compare LED bulbs, compare lumens.
CRI (color rendering index) tells you how accurately the light shows colors. Many lighting designers look for 90 or higher so wood, fabric, and skin tones don't look flat or gray. Budget bulbs often skip listing it, which is a hint.
Buy LEDs. ENERGY STAR notes that LEDs rarely "burn out" in the traditional sense. Instead they dim gradually, with rated life based on when output drops by 30 percent (ENERGY STAR on LED lighting). For an operator that means two things: fewer mid-stay bulb calls, and a slow drift in brightness you won't notice day to day. Replace bulbs by room, all at once, so an older dimmer bulb never sits next to a new one before a reshoot.
Stock a labeled bin of your exact bulb model at the property. Cleaners replace failures with whatever is in the closet, and that's how a 5000K bulb ends up in a bedside lamp.
Layering: Ambient, Task, And Accent
Every guest room needs three layers of light, and the photo needs all of them turned on.
Lighting designers talk about three layers, and they map cleanly onto a rental:
Ambient: The general fill. Ceiling fixtures, recessed cans, and daylight from windows.
Task: Light for doing something. Reading lamps by the bed, under-cabinet light in the kitchen, vanity light at the mirror, a desk lamp for the guest who works.
Accent: Light for mood and depth. A lamp in a dark corner, a sconce by art, string lights on the patio, a lit shelf.
A room lit only by ambient overhead light looks flat in photos and feels like an office at night. Adding a lamp in each dark corner gives the photo depth and the room warmth. It's also the cheapest upgrade in this article. A few matching lamps with warm bulbs will change a living room photo more than a new sofa.
For the stay itself, task lighting is where reviews are won or lost. Guests notice when they can't read in bed, can't see to do makeup, or can't find the bathroom at 2 a.m. Put a reading light on both sides of every bed, add a plug-in night light in hallways and bathrooms, and make sure every lamp can be reached and switched without moving furniture.
If you're working through a broader upgrade list, lighting belongs alongside the other guest-facing investments covered in our look at which amenities actually move occupancy.
Room-By-Room Lighting Setup
Set each room the same way before every shoot: all lights on, same color, blinds open, no bare bulbs in frame.
Use this quick-reference table on shoot day, then read the room notes below for the reasoning behind each setting.
Room | Lights on | Bulb color | Most common miss |
|---|
Living room | Every lamp and overhead fixture, plus a lamp in any dark corner | Warm 2700K | Exposed bare bulbs that turn into hot spots |
Kitchen | Under-cabinet, range-hood and matching pendants | 3000K–3500K reads clean here | Cluttered counters and mismatched pendant bulbs |
Bedrooms | Both bedside lamps and the overhead, blinds open | Warm 2700K | A dark headboard wall behind an unlit bed |
Bathrooms | Every fixture, including shower light and vanity | Match every vanity bulb | The camera or photographer reflected in the mirror |
Outdoor and exterior | String, porch, landscape and pool lights for the twilight shot | Match fixtures within each area | Dead bulbs discovered at dusk on shoot day |
Living room
Turn on every lamp and overhead fixture. Place a lamp in any corner that would otherwise read as dark. Keep lampshades straight and seams turned to the back. If a ceiling fixture has visible bare bulbs, swap to a shaded fixture or frosted bulbs, because exposed filaments become bright hot spots in the photo.
Kitchen
Under-cabinet lighting does more for a kitchen photo than anything else, because it lights the counters where the eye lands. Clear the counters, turn on range-hood lights, and make sure pendant bulbs match each other. This is the one room where a slightly cooler 3000K–3500K reads as clean rather than cold.
Bedrooms
Both bedside lamps on, overhead on, blinds open. The bed is the subject, so aim light at it. A dark headboard wall behind an unlit bed is the most common weak bedroom shot. Warm 2700K bulbs suit this room.
Bathrooms
Bathrooms are small, often windowless, and full of reflective surfaces. Turn on every fixture, including the shower light and vanity. Replace mismatched vanity bulbs first. Close the toilet lid, and watch mirrors so the camera, the photographer, and the flash don't show up in them.
Outdoor spaces and exteriors
Patio string lights, porch lights, landscape lights, and pool lights all belong in the twilight shot. Replace any dead bulbs a week before the shoot, because you won't find them until dusk. Outdoor lighting also matters for safety and arrivals. A guest checking in after dark needs a lit path, a lit keypad, and a lit house number.
Camera Basics: Bracketing, HDR, And White Balance
Use a tripod, bracket three to five exposures, and set white balance to match your bulbs so the camera doesn't guess.
Interiors are hard for any camera because a bright window and a dim corner sit in the same frame. Bracketing solves that. The camera takes several shots of the same scene at different exposures — one dark enough to hold the window view, one bright enough to open the shadows, and one in between. Software then blends them into a single image. That blend is what most people mean by HDR: one image holding more brightness range than a single frame can.
What you need to do it yourself:
A tripod. Bracketed frames must line up exactly. Handheld brackets blur and ghost.
A wide lens, used carefully. Wide lenses make rooms look larger, but go too wide and walls bend and rooms look distorted. Shoot from around chest height and keep the camera level so vertical lines stay vertical.
Manual or locked white balance. Auto white balance shifts between frames and rooms. Set it to match your bulbs (a tungsten or warm setting, or a Kelvin value near your bulb rating) and leave it there for the interior set.
Bracketing mode. Most modern cameras and many phones offer it. Phone HDR modes do a version of this automatically and are usable for a first listing, especially on a tripod.
The failure mode of HDR is overprocessing: gray, flat rooms with glowing halos around windows and cartoonish color. If a photo looks like an illustration, dial it back. The goal is a photo that matches what the guest will see when they walk in.
Before You Press the Shutter
Replace any mismatched or dead bulbs, room by room.
Clean windows and remove screens where possible.
Open every blind and curtain.
Turn on every light in the room being shot.
Clear counters, straighten shades, hide cords.
Set white balance and lock it.
Shoot bracketed frames from a tripod at chest height.
Check the preview for blown windows and dark corners before moving on.
DIY Or Hire A Photographer?
Hire a professional real estate or hospitality photographer for your launch and any major refresh, and shoot seasonal updates yourself.
Doing it yourself makes sense when the property is small, the light is good, you already own a tripod, and you are updating a few photos rather than rebuilding the whole set. It also makes sense for quick seasonal swaps: a snow shot for a winter cabin, a pool shot once the pool opens.
Hiring makes sense when:
You're launching a new listing and the first impression sets your early reviews and ranking.
The property has big windows or views that are hard to hold in a single exposure.
You want twilight exteriors, which need precise timing and editing.
You've renovated or refurnished and the old photos no longer match the stay.
Your click-through or booking rate lags comparable listings at similar prices.
Get quotes from two or three photographers who shoot rentals or real estate in your market, and ask to see full interior sets, not just their best exterior. Look for straight vertical lines, windows that show the view, and rooms that look like rooms rather than paintings.
Whoever shoots, you still do the lighting prep. A photographer can't fix a house full of mismatched bulbs in the time they're on site. Send them your floor plan, your list of must-have shots, and your twilight window from the solar calculator ahead of time.
Photos also only work if the rest of the listing supports them. Our guide to optimizing your listing for search covers titles, photo order, and captions so the new images get seen.
Keep It Consistent After The Shoot
The photo is a promise, so write the lighting standard into your turnover checklist and audit it every quarter.
Great photos plus inconsistent lighting on arrival is a recipe for "not as pictured" feedback. Put lighting into your operations:
Add "all bulbs working, all matching" to the cleaner's turnover checklist, with the exact bulb model listed. A written standard like the one in our STR SOP blueprint is what makes this stick across cleaners.
Set lamps to be on when guests arrive in the evening. Smart plugs or smart bulbs can schedule it, and a lit house at check-in sets the tone before the guest reads anything.
Walk the property at night once a quarter. Turn everything on and look for dead bulbs, mismatched colors, and dark zones.
Reshoot any room you change. New furniture with old photos breaks guest trust.
If you aren't sure whether photos are the real bottleneck in your listing or just the most visible one, book a complimentary one-on-one diagnostic call and we'll look at the whole revenue picture with you.
Frequently Asked Questions
What color temperature bulbs are best for Airbnb photos?
For bedrooms and living areas, 2700K to 3000K warm white is the safe default. Kitchens and work areas can go to 3500K or so. What matters most is consistency: every bulb in a room should match, because the camera exaggerates color differences.
Should I turn the lights on or off for listing photos?
On. Every lamp and fixture in the room, plus open blinds for daylight. Lights that are on add warmth and depth and signal that the space is ready for guests. The exception is a fixture with a mismatched or harsh bulb, which you should replace rather than leave off.
What time of day is best to photograph a rental?
For interiors, bright but indirect daylight, often mid-morning or mid-afternoon, avoiding direct sun through the windows being shot. For the front exterior, shoot when the sun lights the facade. For a twilight hero shot, shoot in the brief blue window just after sunset with every light on.
Can I shoot listing photos with my phone?
Yes, for a first listing or a seasonal update, if you use a tripod, turn on HDR, keep the phone level, and prep the lighting well. A professional is still the better choice for a launch, big windows, or twilight exteriors.
What is bracketing in real estate photography?
Bracketing means taking several photos of the same scene at different exposures and blending them. The darker frame holds the window view, the brighter frame opens the shadows, and the blend shows both.
How often should I replace the bulbs in my rental?
Replace failures immediately with the exact matching model, and replace a whole room at once when bulbs start looking dimmer or mismatched. LEDs fade gradually rather than failing suddenly, so a quarterly night walk-through catches drift before guests do.
Sources